Had to install the ESXi Client on a new VM today I used the instruction from THIS site.
The steps are as follows:
On the Vmware client menu select Inventory, Virtual Machine, Guest, Install / Upgrade Vmware Tools.
Update the server:
# apt-get update && apt-get upgrade -y
Create a mount point
# mkdir /media/cdrom
mount the ISO:
# mount /dev/cdrom /media/cdrom
If you get an error about /dev/cdrom doesn't exist try the following:
# mount /dev/cdrom1 /media/cdrom
Change Directory:
# cd /media/cdrom
Copy the tar file to /tmp:
# cp VM*.tar.gz /tmp
Change Directory:
# cd /tmp
Unmount the ISO:
# umount /media/cdrom
Extract the tar:
# tar xzvf VM*.tar.gz
Change Directory:
# cd vmware-tools-distrib
Run the Install Script with the -d switch to install the defaults:
# ./vmware-install.pl -d
Reboot the Server:
# reboot
Tuesday 31 March 2015
Saturday 28 March 2015
How To Map A Network Drive Onto Ubuntu 14.04 Permanently
Been looking for a way to backup a client windows server to Linux Rsnapshot server for a while and just found THIS article which did the trick nicely.
This simple tutorial shows you how to map a network drive, Windows share as example, onto Ubuntu 14.04 LTS with read and write permission permanently.
All things will be done in a terminal window. Not familiar with Linux command? Don’t be afraid, just paste the command into terminal and hit enter to run one by one. There will be a few pictures to make things more clear.
Preparation:
There are a few preliminary actions we need to do before we can start mounting using cifs.
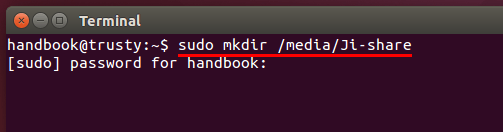
1. Press Ctrl+Alt+T on keyboard to open the terminal. Paste the command below and run to create a mount point, you can replace ‘Ji-share’ to what you want.
sudo mkdir /media/Ji-share
2. Install
cifs-utils, which provides support for cross-platform file sharing with Microsoft Windows, OS X and other Unix systems.
Install it from Ubuntu Software Center, or via below command:
sudo apt-get install cifs-utils
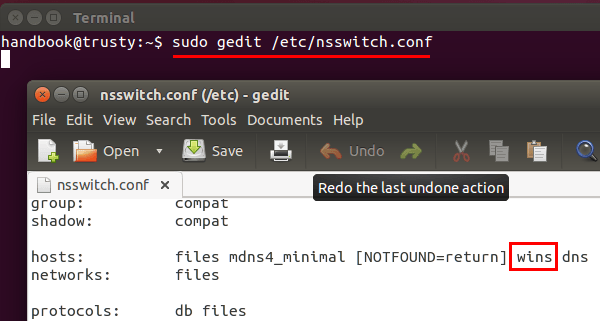
3. Edit the /etc/nsswitch.conf:
sudo gedit /etc/nsswitch.conf
Find the line looks like:
hosts: files mdns4_minimal [NOTFOUND=return] dns
change it into:
hosts: files mdns4_minimal [NOTFOUND=return] wins dns
4. Run below command so that your Ubuntu can resolve Windows computer name on a DHCP network.
sudo apt-get install libnss-winbind winbind
Reboot Ubuntu, or restart your network.
Mount (map) network drive:
Now edit the fstab file to mount network share on start up.
1. Make a backup by running the command below:
sudo cp /etc/fstab /etc/fstab_old
If you need to restore your backup, run:
sudo mv /etc/fstab_old /etc/fstab
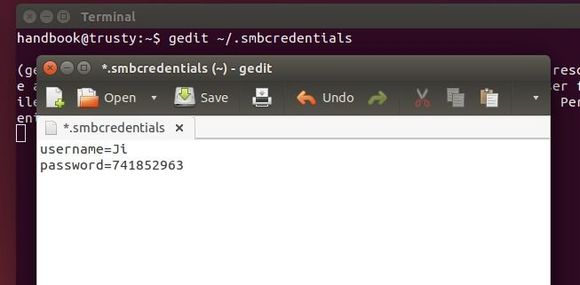
2. Create a credentials file via:
gedit ~/.smbcredentials
insert the username and password for accessing the remote share. Replace “Ji” & “741852963″ with yours and save the file.
username=Ji
password=741852963
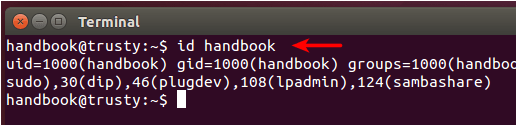
3. Run command to get your gid and uid. Replace handbook with your user name.
id handbook
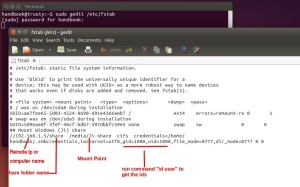
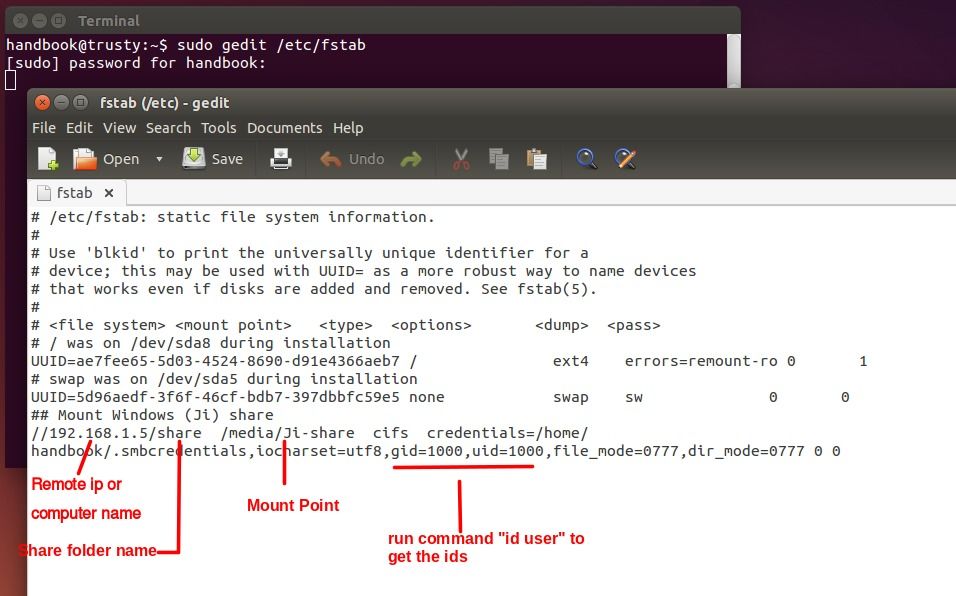
4. Now edit the fstab by running the command:
sudo gedit /etc/fstab
Add below line (one line) to the end and save it. REPLACE WORDS IN RED!
//192.168.1.5/share /media/Ji-share cifs credentials=/home/handbook/.smbcredentials,iocharset=utf8,gid=1000,uid=1000,file_mode=0777,dir_mode=0777 0 0
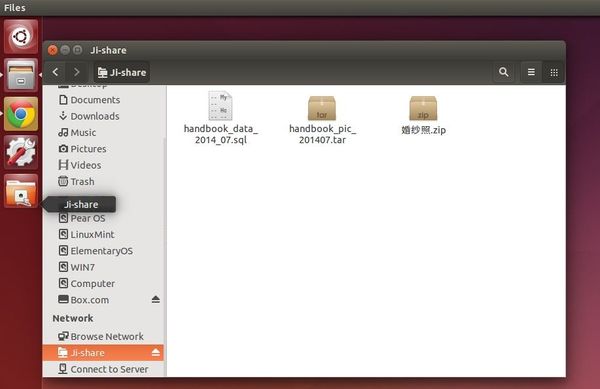
Finally run sudo mount -a in terminal and you’ll get the network share mapped in Unity Launcher and Nautilus file browser:
Friday 27 March 2015
Changing the logo on OwnCloud
I have just stumbled onto THIS article on how to change the logos on Owncloud. Will try this later and document it.
Backing up an Owncloud Installation
Found THIS blog which explains how to backup OwnCloud with Rsnapshot which is a linux based backup solution that I love to use as it is really efficient and simple to install and configure.
The article is below:
The article is below:
After getting Owncloud up and running, I wanted to start making backups of the MySQL database and my custom configuration files. This ended up being easier than I thought. I found a good source describing the process here and also used the owncloud documentation. My basic plan is to use the rsnapshot tool to dump my MySQL database and backup my /var/www directory. In my installation, the Owncloud files are in the /var/www directory. A default installation would put those files in /var/www/owncloud, so make the appropriate adjustments if your installation is there.
First, I installed rsnapshot:
First, I installed rsnapshot:
sudo apt-get updatesudo apt-get install rsnapshot
Then I set up a backup directory on the same 2TB USB drive that I have the data on.
sudo mkdir /media/owncloud/backupssudo chmod 755 /media/owncloud/backupssudo chown root:root /media/owncloud/backups
Next I set up rsnapshot config file. First, I copied the config file in case I messed it up:
sudo cp /etc/rsnapshot.conf /etc/rsnapshot.conf.old
Next I edited in the file. Note that this file requires tabs, not spaces, and you must have the trailing “/” on paths.
sudo nano /etc/rsnapshot.conf
First, I found the “SNAPSHOT ROOT DIRECTORY” section and change “snapshot_root” to path where the backups will be stored:
snapshot_root /media/owncloud/backups/
Then I found the “BACKUP INTERVALS” section. I commented out all the retain lines except the “daily” by making sure “retain daily 7″ was uncommented.
I scrolled down to the entry for the logfile. I prefer to keep it in my log file directory:
logfile /var/log/rsnapshot.log
Then I moved down to the “BACKUP POINTS / SCRIPTS” section. This is where you set up the backups. The first line backups the configuration (actually, the entire website except the data files stored on the USB drive). The second line dumps the MySQL database,
# Owncloud – note: no data backup configured
#Backup Config
backup /var/www/ owncloud/
backup_script /usr/local/bin/backup_mysql.sh owncloud/database_dump
At this point, I saved and exited the rsnapshot config file and set up the MySQL script we added in the last step. First I moved the two required script files to /usr/local/bin/:
sudo cp /usr/share/doc/rsnapshot/examples/utils/backup_mysql.sh /usr/local/bin/sudo cp /usr/share/doc/rsnapshot/examples/utils/mysqlbackup.pl /usr/local/bin/
Then I set up the ownership and made them executable:
sudo chown root:root /usr/local/bin/backup_mysql.shsudo chown root:root /usr/local/bin/mysqlbackup.plsudo chmod 754 /usr/local/bin/backup_mysql.shsudo chmod 754 /usr/local/bin/mysqlbackup.pl
Finally, I edited the script to only dump the Owncloud database.
sudo nano /usr/local/bin/backup_mysql.sh
I commented out the full backup and setup a backup of the owncloud database only. Make sure you use your owncloud database password.
# backup Owncloud database and make readable only by root
/usr/bin/mysqldump -uowncloud -ppassword owncloud > owncloud_db.sql
/bin/chmod 600 owncloud_db.sql
That should configure everything. First thing I did was test that the config file didn’t have syntax errors:
sudo rsnapshot configtest
It came back with “Syntax OK”, so should be all set.
I ran the backup once, then checked the logs and backup directories to ensure it worked (it did!).
sudo rsnapshot daily
Finally, I automate with a crontab to run at 1:30am every morning.
sudo crontab -e
Then I added:
30 01 * * * /usr/bin/rsnapshot daily
Finally, here are the commands to restore the various parts of Owncloud:
Restore config:
rsync -avr --delete /media/owncloud/backups/daily.0/owncloud/var/www/config /var/www/
Restore apps:
rsync -avr --delete /media/owncloud/backups/daily.0/owncloud/var/www/apps /var/www/
Restore Themes:
rsync -avr --delete /media/owncloud/backups/daily.0/owncloud/var/www/themes /var/www/
Restore database:
mysql -u owncloud -powncloud owncloud < /media/owncloud/backups/daily.0/owncloud/database_dump/owncloud_db.sql
Ubuntu - Removing old Network Cards
I a server hardware fail today and had to swap the hard drive into another server. When I booted up the server it did not have an ip address as eth0 wasnt found.
This was a simple fix all I did was delete /etc/udev/rules.d/70-persistent-net.rules
I then rebooted the server and it greated a new file with the installed network card configured as eth0. This got the networking working as it should be.
This was a simple fix all I did was delete /etc/udev/rules.d/70-persistent-net.rules
I then rebooted the server and it greated a new file with the installed network card configured as eth0. This got the networking working as it should be.
Thursday 26 March 2015
Making Ubuntu 14.04 Bootable PenDrive
Had to make a bootable Ubuntu 14.04 pen drive today. Tried unetbootin and Linux Live USB Creator but for some reason they didnt work!
I then found Universal USB Installer which worked first time.
I then found Universal USB Installer which worked first time.
Adding php UTF-8 support
When OwnCloud was first installed I got an error below in the admin section:
This was easily resolved by doing the following:
1. Edit /etc/php5/apache2/php.ini
# vim /etc/php5/apache2/php.ini
2. Search for UTF-8
3. Change the line from:
;default_charset = "UTF-8"
4. To:
default_charset = "UTF-8"
A configuração de caracteres no PHP não está definida para UTF-8
A configuração de caracteres para o PHP não está definida para UTF-8. Isto pode causar problemas com caracteres não-ASCII em nomes de arquivos. Nós fortemente recomendamos a troca da definição de caracteres de 'default_charset' no arquivo de configuração php.ini para 'UTF-8'.This was easily resolved by doing the following:
1. Edit /etc/php5/apache2/php.ini
# vim /etc/php5/apache2/php.ini
2. Search for UTF-8
3. Change the line from:
;default_charset = "UTF-8"
4. To:
default_charset = "UTF-8"
5. Save the changes
6. Restart Apache2:
# /etc/init.d/apache2 restart
7. The error is now gone.
Installing OwnCloud 8 on Ubuntu 14.04
Yesterday I found an easier way to install OwnCloud 8 on Ubuntu 14.04 without all of the errors that I was getting installing the packager from the OwnCloud Site.
I used the downloadable package from HERE and used the xUbuntu 1404 instructions with the following additional steps.
Step 1. First of all log in to your server as root and make sure that all packages are up to date.
apt-get update
apt-get upgrade
Step 2. Instal Apache web server on your Ubuntu 14.04 VPS if it is not already installed.
apt-get install apache2
Step 3. Next, install PHP on your server.
apt-get install php5 php5-mysql
Once the installation is done add the following PHP modules required by OwnCloud:
apt-get install php5-gd php5-json php5-curl php5-intl php5-mcrypt php5-imagick
Step 4. Install MySQL database server.
apt-get install mysql-server
Step 5. Create a new MySQL database for OwnCloud using the following commands.
#mysql -u root -p
Enter password:
mysql> CREATE USER 'ownclouduser'@'localhost' IDENTIFIED BY 'YOURPASSWORD';
mysql> CREATE DATABASE ownclouddb;
mysql> GRANT ALL ON ownclouddb.* TO 'ownclouduser'@'localhost';
mysql> FLUSH PRIVILEGES;
mysql> exit
Step 6. Add the repository too the apt source list.
sudo sh -c "echo 'deb http://download.opensuse.org/repositories/isv:/ownCloud:/community/xUbuntu_14.04/ /' >> /etc/apt/sources.list.d/owncloud.list"
Step 7. Install the key for the new repository by running the following commands:
wget http://download.opensuse.org/repositories/isv:ownCloud:community/xUbuntu_14.04/Release.key
sudo apt-key add - < Release.key
Step 8. Update the apt repository list
sudo apt-get update
Step 9. Install OwnCloud
sudo apt-get install owncloud
Step 10. Go to your newly installed OwnCloud install by putting http://serverip/owncloud in the browser.
Step 11. Add an admin user and password

Step 12. Click on Storage and Databases

Step 13. select mysql

Step 14. Add the database settings and click finish configurations.

Step 12. Click on Storage and Databases
Step 13. select mysql
Step 14. Add the database settings and click finish configurations.
Step 15. The writing on the Finish Configuration will change to Finishing and the browser will be greyed out while the settings are configured.
 Step 16. Once the configuration hasfinished you will see the Welcome screen OwnCloud is now installed.

Finding Zentyal Mysql root password
This morning I was trying to install OwnCloud on a Zentyal 4.0 server. The only problem that I found was with finding the root password for mysql to create the OwnCloud database.
I found the solution on THIS site.
The solution was way too simple it was literally to run the comand below which displays the password on screen.
echo $(sudo cat /var/lib/zentyal/conf/zentyal-mysql.passwd)
I found the solution on THIS site.
The solution was way too simple it was literally to run the comand below which displays the password on screen.
echo $(sudo cat /var/lib/zentyal/conf/zentyal-mysql.passwd)
Tuesday 24 March 2015
Increaing maximum file size for OwnCloud
Today we had to raise the size limit of owncloud to allow for files over 2mb to be uploaded.
It is a really easy process:
Under Debian or SUSE and their derivatives this file resides at /etc/php5/apache2/php.ini
On Windows, you can find this file within C:\Program Files (x86)\PHP\PHP.ini
Set the following two parameters inside the php.ini to the same value as chosen inside the admin-section one step before:
upload_max_filesize = 16G (e.g., to stay consistent with the example value above)
post_max_size = 16G (e.g., to stay consistent with the example value above)
Restart Apache2
/etc/init.d/apache2 restart
These details were taken from this documentation.
Monday 23 March 2015
Ubunut Installing Java 7 from apt-get
The Oracle JDK is the official JDK; however, it is no longer provided by Oracle as a default installation for Ubuntu.
You can still install it using apt-get. To install any version, first execute the following commands:
sudo apt-get install python-software-propertiessudo add-apt-repository ppa:webupd8team/java
sudo apt-get update
Oracle JDK 7
sudo apt-get install oracle-java7-installerOwnCloud Adding SSL encryption
I followed the directions from here, except that I had to make one very important addition before creating the certificate.
1. Install openssl and add it to apache:
sudo apt-get install openssl
sudo a2enmod ssl
sudo a2enmod rewrite
2. Make the SSL certificate. IMPORTANT: I had to set an environment variable before creating the certificate to give my server a name, otherwise the OwnCloud desktop client wouldn't accept the certificate.
export CN="owncloud"  ## This is the important environment variable
sudo mkdir -p /etc/apache2/ssl
sudo openssl req -new -x509 -days 365 -nodes -out /etc/apache2/ssl/owncloud.pem -keyout /etc/apache2/ssl/owncloud.key
sudo /etc/init.d/apache2 restart
3. I had to edit the OwnCloud configuration file so that https redirect works. Here is the new file from
/etc/apache2/conf-enabled/owncloud.conf:<VirtualHost IP-address-of-server:80>
ServerName myowndomain.com
ServerAlias www.myowndomain.com
#### Redirect to port 443 ###
RewriteEngine on
ReWriteCond %{SERVER_PORT} !^443$
RewriteRule ^/(.*) https://%{HTTP_HOST}/$1 [NC,R,L]
#### End of Redirection configuration ###
Alias /owncloud /usr/share/owncloud
<Directory /usr/share/owncloud/>
Options +FollowSymLinks
AllowOverride All
<IfVersion < 2.3>
order allow,deny
allow from all
</IfVersion>
<IfVersion >= 2.3>
Require all granted
</IfVersion>
</Directory>
</VirtualHost>
<VirtualHost IP-address-of-server:443>
ServerName myowndomain.com
ServerAlias www.myowndomain.com
####Configuration for SSL #####
SSLEngine on
SSLCertificateFile /etc/apache2/ssl/owncloud.pem
SSLCertificateKeyFile /etc/apache2/ssl/owncloud.key
#### End of SSL Configuration ####
Alias /owncloud /usr/share/owncloud
<Directory /usr/share/owncloud/>
Options +FollowSymLinks
AllowOverride All
<IfVersion < 2.3>
order allow,deny
allow from all
</IfVersion>
<IfVersion >= 2.3>
Require all granted
</IfVersion>
</Directory>
</VirtualHost>
4. Lastly I restarted apache
sudo /etc/init.d/apache2 restart and checked to see if the OwnCloud login was now accessible via https and not http.
5. Note that for the desktop and iOS clients, I think I had to give the full address of the server, i.e.
https://myowndomain.com/owncloud.Friday 20 March 2015
Backing up Mikrotik using export and import
Today I was shown the export and import comands on mikrotik. The export command exports all the settings of the router into a editable test file.
The command for the terminal is:
export file=name of file.
This creates the file in the files folder on the router.
If you then copy the file to files on a new router and run the import comand you will restore the router to the same config as the original one.
The command for the terminal is:
export file=name of file.
This creates the file in the files folder on the router.
If you then copy the file to files on a new router and run the import comand you will restore the router to the same config as the original one.
Thursday 19 March 2015
OwnCload User Authentication with LDAP
I used the documentation below from the OwnCload site to configure the AD authentication.


User Authentication with LDAP
ownCloud ships with an LDAP application so that your existing LDAP users may have access to your ownCloud server without creating separate ownCloud user accounts.
Note
For performance reasons, we recommend using PHP 5.4 or greater to use the LDAP application with more than 500 users. The PHP LDAP module is required; this is supplied by
php5-ldap on Debian/Ubuntu, and php-ldap on CentOS/Red Hat/Fedora.
The LDAP application supports:
- LDAP group support
- File sharing with ownCloud users and groups
- Access via WebDAV and ownCloud Desktop Client
- Versioning, external Storage and all other ownCloud features
- Seamless connectivity to Active Directory, with no extra configuration required
- Support for primary groups in Active Directory
- Auto-detection of LDAP attributes such as base DN, email, and the LDAP server port number
Note
The LDAP app is not compatible with the
WebDAV user backend app. You cannot use both of them at the same time.Configuration
First enable the
LDAP user and group backend app on the Apps page in ownCloud. Then go to your Admin page to configure it.
The LDAP configuration panel has four tabs. A correctly completed first tab (“Server”) is mandatory to access the other tabs. A green indicator lights when the configuration is correct. Hover your cursor over the fields to see some pop-up tooltips.
Server Tab
Start with the Server tab. You may configure multiple servers if you have them. At a minimum you must supply the LDAP server’s hostname. If your server requires authentication, enter your credentials on this tab. ownCloud will then attempt to auto-detect the server’s port and base DN. The base DN and port are mandatory, so if ownCloud cannot detect them you must enter them manually.
- Server configuration:
- Configure one or more LDAP servers. Click the Delete Configuration button to remove the active configuration.
- Host:
- The host name or IP address of the LDAP server. It can also be a ldaps:// URI. If you enter the port number, it speeds up server detection.Examples:
- directory.my-company.com
- ldaps://directory.my-company.com
- directory.my-company.com:9876
- Port:
- The port on which to connect to the LDAP server. The field is disabled in the beginning of a new configuration. If the LDAP server is running on a standard port, the port will be detected automatically. If you are using a non-standard port, ownCloud will attempt to detect it. If this fails you must enter the port number manually.Example:
- 389
- User DN:
- The name as DN of a user who has permissions to do searches in the LDAP directory. Leave it empty for anonymous access. We recommend that you have a special LDAP system user for this.Example:
- uid=owncloudsystemuser,cn=sysusers,dc=my-company,dc=com
- Password:
- The password for the user given above. Empty for anonymous access.
- Base DN:
- The base DN of LDAP, from where all users and groups can be reached. You may enter multiple base DNs, one per line. (Base DNs for users and groups can be set in the Advanced tab.) This field is mandatory. ownCloud attempts to determine the Base DN according to the provided User DN or the provided Host, and you must enter it manually if ownCloud does not detect it.Example:
- dc=my-company,dc=com
User Filter
Use this to control which LDAP users have access to your ownCloud server. You may bypass the form fields and enter a raw LDAP filter if you prefer.
- only those object classes:
- ownCloud will determine the object classes that are typically available for user objects in your LDAP. ownCloud will automatically select the object class that returns the highest amount of users. You may select multiple object classes.
- only from those groups:
- If your LDAP server supports the
member-of-overlayin LDAP filters, you can define that only users from one or more certain groups are allowed to appear and log in into ownCloud. By default, no value will be selected. You may select multiple groups.If your LDAP server does not support the member-of-overlay in LDAP filters, the input field is disabled. Please contact your LDAP administrator. - Edit raw filter instead:
- Clicking on this text toggles the filter mode and you can enter the raw LDAP filter directly.Example:
- objectClass=inetOrgPerson
- x users found:
- This is an indicator that tells you approximately how many users will be allowed to access ownCloud. The number updates automatically after any changes.
Login Filter
The settings in the Login Filter tab determine what the user’s login will be, for example an LDAP username, or an email address. You may select multiple user details. (You may bypass the form fields and enter a raw LDAP filter if you prefer.)
You may override your User Filter settings on the User Filter tab by using a raw LDAP filter.
- LDAP Username:
- If this value is checked, the login value will be compared to the username in the LDAP directory. The corresponding attribute, usually uid or samaccountname will be detected automatically by ownCloud.
- LDAP Email Address:
- If this value is checked, the login value will be compared to an email address in the LDAP directory; specifically, themailPrimaryAddress and mail attributes.
- Other Attributes:
- This multi-select box allows you to select other attributes for the comparison. The list is generated automatically from the user object attributes in your LDAP server.
- Edit raw filter instead:
- Clicking on this text toggles the filter mode and you can enter the raw LDAP filter directly.The %uid placeholder is replaced with the login name entered by the user upon login.Examples:
- only username: uid=%uid
- username or email address: (|(uid=%uid)(mail=$uid))
Group Filter
By default, no LDAP groups will be available in ownCloud. The settings in the group filter tab determine which groups will be available in ownCloud. You may also elect to enter a raw LDAP filter instead.
- only those object classes:
- ownCloud will determine the object classes that are typically available for group objects in your LDAP server. ownCloud will only list object classes that return at least one group object. You can select multiple object classes. A typical object class is “group”, or “posixGroup”.
- only from those groups:
- ownCloud will generate a list of available groups found in your LDAP server. and then you select the group or groups that get access to your ownCloud server.
- Edit raw filter instead:
- Clicking on this text toggles the filter mode and you can enter the raw LDAP filter directly.Example:
- objectClass=group
- objectClass=posixGroup
- y groups found:
- This tells you approximately how many groups will be available in ownCloud. The number updates automatically after any change.
Advanced Settings
The LDAP Advanced Setting section contains options that are not needed for a working connection. This provides controls to disable the current configuration, configure replica hosts, and various performance-enhancing options.
The Advanced Settings are structured into three parts:
- Connection Settings
- Directory Settings
- Special Attributes
Connection Settings
LDAP Advanced Settings, section Connection Settings
- Configuration Active:
- Enables or Disables the current configuration. By default, it is turned off. When ownCloud makes a successful test connection it is automatically turned on.
- Backup (Replica) Host:
- If you have a backup LDAP server, enter the connection settings here. ownCloud will then automatically connect to the backup when the main server cannot be reached. The backup server must be a replica of the main server so that the object UUIDs match.Example:
- directory2.my-company.com
- Backup (Replica) Port:
- The connection port of the backup LDAP server. If no port is given, but only a host, then the main port (as specified above) will be used.Example:
- 389
- Disable Main Server:
- You can manually override the main server and make ownCloud only connect to the backup server. This is useful for planned downtimes.
- Case insensitive LDAP server (Windows):
- When the LDAP server is running on a Windows Host.
- Turn off SSL certificate validation:
- Turns off SSL certificate checking. Use it for testing only!
- Cache Time-To-Live:
- A cache is introduced to avoid unnecessary LDAP traffic, for example caching usernames so they don’t have to be looked up for every page, and speeding up loading of the Users page. Saving the configuration empties the cache. The time is given in seconds.Note that almost every PHP request requires a new connection to the LDAP server. If you require fresh PHP requests we recommend defining a minimum lifetime of 15s or so, rather than completely eliminating the cache.Examples:
- ten minutes: 600
- one hour: 3600
See the Caching section below for detailed information on how the cache operates.
Directory Settings
LDAP Advanced Settings, section Directory Settings
- User Display Name Field:
- The attribute that should be used as display name in ownCloud.
- Example: displayName
- Base User Tree:
- The base DN of LDAP, from where all users can be reached. This must be a complete DN, regardless of what you have entered for your Base DN in the Basic setting. You can specify multiple base trees, one on each line.
- Example:cn=programmers,dc=my-company,dc=comcn=designers,dc=my-company,dc=com
- User Search Attributes:
- These attributes are used when searches for users are performed, for example in the in the share dialogue. The user display name attribute is the default. You may list multiple attributes, one per line.If an attribute is not available on a user object, the user will not be listed, and will be unable to login. This also affects the display name attribute. If you override the default you must specify the display name attribute here.
- Example:displayNamemail
- Group Display Name Field:
- The attribute that should be used as ownCloud group name. ownCloud allows a limited set of characters (a-zA-Z0-9.-_@). Once a group name is assigned it cannot be changed.
- Example: cn
- Base Group Tree:
- The base DN of LDAP, from where all groups can be reached. This must be a complete DN, regardless of what you have entered for your Base DN in the Basic setting. You can specify multiple base trees, one in each line.
- Example:cn=barcelona,dc=my-company,dc=comcn=madrid,dc=my-company,dc=com
- Group Search Attributes:
- These attributes are used when a search for groups is done, for example in the share dialogue. By default the group display name attribute as specified above is being used. Multiple attributes can be given, one in each line.If you override the default, the group display name attribute will not be taken into account, unless you specify it as well.
- Example:cndescription
- Group Member association:
- The attribute that is used to indicate group memberships, i.e. the attribute used by LDAP groups to refer to their users.ownCloud detects the value automatically. You should only change it if you have a very valid reason and know what you are doing.
- Example: uniquemember
Special Attributes
LDAP Advanced Settings, section Special Attributes
- Quota Field:
- ownCloud can read an LDAP attribute and set the user quota according to its value. Specify the attribute here, and it will return human-readable values, e.g. “2 GB”.
- Example: ownCloudQuota
- Quota Default:
- Override ownCloud default quota for LDAP users who do not have a quota set in the Quota Field.
- Example: 15 GB
- Email Field:
- Set the user’s email from their LDAP attribute. Leave it empty for default behavior.
- Example: mail
- User Home Folder Naming Rule:
- By default, the ownCloud server creates the user directory in your ownCloud data directory. You may want to override this setting and name it after an attribute value. The attribute given can also return an absolute path, e.g.
/mnt/storage43/alice. Leave it empty for default behavior.- Example: cn
Expert Settings
In the Expert Settings fundamental behavior can be adjusted to your needs. The configuration should be well-tested before starting production use.
- Internal Username:
- The internal username is the identifier in ownCloud for LDAP users. By default it will be created from the UUID attribute. The UUID attribute ensures that the username is unique, and that characters do not need to be converted. Only these characters are allowed: [a-zA-Z0-9_.@-]. Other characters are replaced with their ASCII equivalents, or are simply omitted.The LDAP backend ensures that there are no duplicate internal usernames in ownCloud, i.e. that it is checking all other activated user backends (including local ownCloud users). On collisions a random number (between 1000 and 9999) will be attached to the retrieved value. For example, if “alice” exists, the next username may be “alice_1337”.The internal username is the default name for the user home folder in ownCloud. It is also a part of remote URLs, for instance for all *DAV services.You can override all of this with the Internal Username setting. Leave it empty for default behaviour. Changes will affect only newly mapped LDAP users.
- Example: uid
- Override UUID detection
- By default, ownCloud auto-detects the UUID attribute. The UUID attribute is used to uniquely identify LDAP users and groups. The internal username will be created based on the UUID, if not specified otherwise.You can override the setting and pass an attribute of your choice. You must make sure that the attribute of your choice can be fetched for both users and groups and it is unique. Leave it empty for default behaviour. Changes will have effect only on newly mapped LDAP users and groups. It also will have effect when a user’s or group’s DN changes and an old UUID was cached, which will result in a new user. Because of this, the setting should be applied before putting ownCloud in production use and clearing the bindings (see the
User and Group Mappingsection below).- Example: cn
- Username-LDAP User Mapping
- ownCloud uses usernames as keys to store and assign data. In order to precisely identify and recognize users, each LDAP user will have a internal username in ownCloud. This requires a mapping from ownCloud username to LDAP user. The created username is mapped to the UUID of the LDAP user. Additionally the DN is cached as well to reduce LDAP interaction, but it is not used for identification. If the DN changes, the change will be detected by ownCloud by checking the UUID value.The same is valid for groups.The internal ownCloud name is used all over in ownCloud. Clearing the Mappings will have leftovers everywhere. Never clear the mappings in a production environment, but only in a testing or experimental server.Clearing the Mappings is not configuration sensitive, it affects all LDAP configurations!
Testing the configuration
The Test Configuration button checks the values as currently given in the input fields. You do not need to save before testing. By clicking on the button, ownCloud will try to bind to the ownCloud server using the settings currently given in the input fields. The response will look like this:
Failure
In case the configuration fails, you can see details in ownCloud’s log, which is in the data directory and calledowncloud.log or on the bottom the Settings – Admin page. You must refresh the Admin page to see the new log entries.
Success
In this case, Save the settings. You can check if the users and groups are fetched correctly on the Users page.
ownCloud Avatar integration
ownCloud support user profile pictures, which are also called avatars. If a user has a photo stored in the jpegPhoto orthumbnailPhoto attribute on your LDAP server, it will be used as their avatar. In this case the user cannot alter their avatar (on their Personal page) as it must be changed in LDAP. jpegPhoto is preferred over thumbnailPhoto.
Profile picture fetched from LDAP
If the jpegPhoto or thumbnailPhoto attribute is not set or empty, then users can upload and manage their avatars on their ownCloud Personal pages. Avatars managed in ownCloud are not stored in LDAP.
The jpegPhoto or thumbnailPhoto attribute is fetched once a day to make sure the current photo from LDAP is used in ownCloud. LDAP avatars override ownCloud avatars, and when an LDAP avatar is deleted it the most recent ownCloud avatar replaces it.
Photos served from LDAP are automatically cropped and resized in ownCloud. This affects only the presentation, and the original image is not changed.
Troubleshooting, Tips and Tricks
SSL Certificate Verification (LDAPS, TLS)
A common mistake with SSL certificates is that they may not be known to PHP. If you have trouble with certificate validation make sure that
- You have the certificate of the server installed on the ownCloud server
- The certificate is announced in the system’s LDAP configuration file (usually /etc/ldap/ldap.conf on Linux,C:\openldap\sysconf\ldap.conf or C:\ldap.conf on Windows) using a TLS_CACERT /path/to/cert line.
- Using LDAPS, also make sure that the port is correctly configured (by default 636)
Microsoft Active Directory
Compared to earlier ownCloud versions, no further tweaks need to be done to make ownCloud work with Active Directory. ownCloud will automatically find the correct configuration in the set-up process.
Duplicating Server Configurations
In case you have a working configuration and want to create a similar one or “snapshot” configurations before modifying them you can do the following:
- Go to the Server tab
- On Server Configuration choose Add Server Configuration
- Answer the question Take over settings from recent server configuration? with yes.
- (optional) Switch to Advanced tab and uncheck Configuration Active in the Connection Settings, so the new configuration is not used on Save
- Click on Save
Now you can modify and enable the configuration.
ownCloud LDAP Internals
Some parts of how the LDAP backend works are described here.
User and Group Mapping
In ownCloud the user or group name is used to have all relevant information in the database assigned. To work reliably a permanent internal user name and group name is created and mapped to the LDAP DN and UUID. If the DN changes in LDAP it will be detected, and there will be no conflicts.
Those mappings are done in the database table
ldap_user_mapping and ldap_group_mapping. The user name is also used for the user’s folder (except something else is specified in User Home Folder Naming Rule), which contains files and meta data.
As of ownCloud 5 internal user name and a visible display name are separated. This is not the case for group names, yet, i.e. a group name cannot be altered.
That means that your LDAP configuration should be good and ready before putting it into production. The mapping tables are filled early, but as long as you are testing, you can empty the tables any time. Do not do this in production.
Caching
The ownCloud Cache helps to speed up user interactions and sharing. It is populated on demand, and remains populated until the Cache Time-To-Live for each unique request expires. User logins are not cached, so if you need to improve login times set up a slave LDAP server to share the load.
Another significant performance enhancement is to install the Alternative PHP Cache (APC). APC is an OPcache, which is several times faster than a file cache. APC improves PHP performance by storing precompiled script bytecode in shared memory, which reduces the overhead of loading and parsing scripts on each request. (Seehttp://php.net/manual/en/book.apc.php for more information.)
You can adjust the Cache Time-To-Live value to balance performance and freshness of LDAP data. All LDAP requests will be cached for 10 minutes by default, and you can alter this with the Cache Time-To-Live setting. The cache answers each request that is identical to a previous request, within the time-to-live of the original request, rather than hitting the LDAP server.
The Cache Time-To-Live is related to each single request. After a cache entry expires there is no automatic trigger for re-populating the information, as the cache is populated only by new requests, for example by opening the User administration page, or searching in a sharing dialog.
There is one trigger which is automatically triggered by a certain background job which keeps the
user-group-mappings up-to-date, and always in cache.
Under normal circumstances, all users are never loaded at the same time. Typically the loading of users happens while page results are generated, in steps of 30 until the limit is reached or no results are left. For this to work on an oC-Server and LDAP-Server, Paged Results must be supported, which presumes PHP >= 5.4.
ownCloud remembers which user belongs to which LDAP-configuration. That means each request will always be directed to the right server unless a user is defunct, for example due to a server migration or unreachable server. In this case the other servers will also receive the request.
Handling with Backup Server
When ownCloud is not able to contact the main LDAP server, ownCloud assumes it is offline and will not try to connect again for the time specified in Cache Time-To-Live. If you have a backup server configured ownCloud will connect to instead. When you have a scheduled downtime, check Disable Main Server to avoid unnecessary connection attempts.
Subscribe to:
Posts (Atom)